Recently around the New Year’s Holidays, I was working on my Acer Aspire 5742-6488 laptop and I suddenly found out that my laptop was not anymore charging. I tried to remove and insert the power adapter again, but I was unsuccessful at all my attempts. Fortunately I had learnt about this behavior of my laptop quite early, I immediately turned off my laptop to save the hour of battery life that was remaining on my laptop. To understand what the problem was, I checked the charger by plugging it on another laptop. I found that charger to be working fine, so clearly there was a problem with the power DC jack attached to the motherboard of the laptop.
I backup my data to an external hard drive by using the only hour of battery life left on my laptop. Since I knew I was going to purchase another laptop, I decided to open this one just out of curiosity, and find the problem. Hence, I took my screw driver and the opening of my laptop started. Gladly, I recorded the full opening and fixing of my laptop. Therefore, I present to you the 7-video playlist of “How to repair: Power DC Jack on Acer Aspire 5742-6488”.
The steps I took to open the laptop to reach the faulty Power DC Jack cable are listed below.
- Remove Laptop Battery.
- Remove the 2 HDD and RAM cover screws on the bottom of the laptop.
- Remove the 2 screws under the HDD and RAM cover. These screws hold the Hard Drive in place.
- Remove the Hard Drive.
- Remove the Optical Drive screw.
- Remove the screws holding the main laptop chassis on the bottom of the laptop.
- Remove the 4 small screws holding the laptop charging pin under the battery cover.
- Remove the keyboard by carefully taking it out. Remove the keyboard cable.
- Detach the speaker, power button and mouse-pad cables over the palmrest.
- Remove the palmrest screws. Carefully remove the palmrest from the rest of the chassis.
- Detach the video cable of the laptop LCD screen.
- Remove the 4 LCD screws which keeps the laptop screen in place.
- Remove the Power DC Jack from the motherboard.
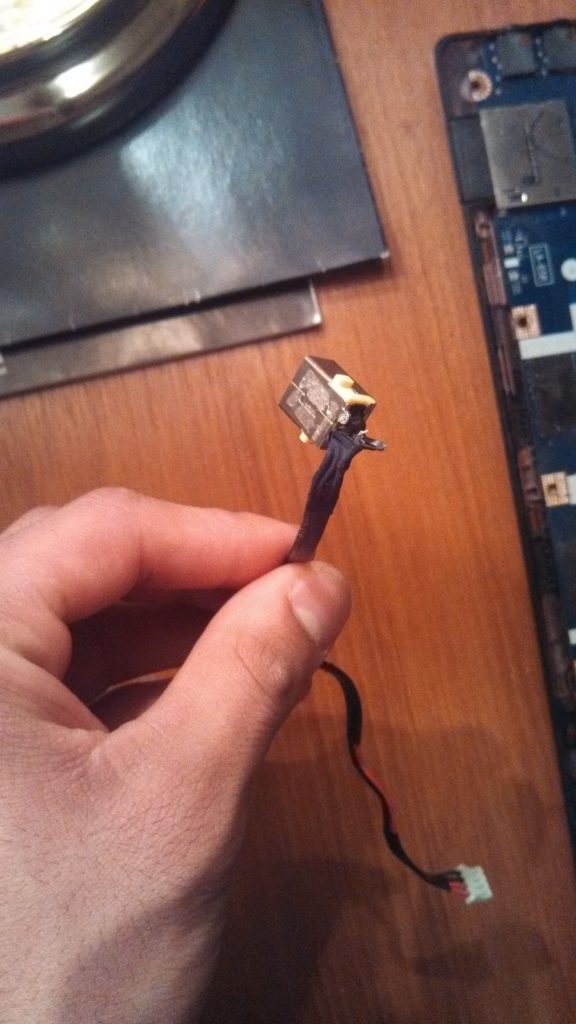
When I reached the power DC Jack cable, I found out that one of the terminals from the power cable somehow got un-soldered from the actual jack. Though I wasn’t sure if this was the only cable, I went ahead to buy a replacement cable from the local computer parts store. The original faulty DC power jack cable is shown in the image below.
After I replaced the faulty Power DC Jack Cable from the new replacement I bought for $10, I assembled all the parts back in the reverse order mentioned above. After full assembly back, I plugged my charger back and turned on my laptop. Much of the effort was recognized as the laptop turned on.
Since then, my laptop has been working fine and there has been no need for me to buy another one. Thus a replacement of $10 saved an amount of $700 that I would put to buy a new laptop altogether.